[ 2003-November-24 12:25 ]
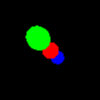
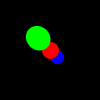
I reorganized some code to make implementing various anti-aliasing schemes easier. Below are six images using different levels of adaptive anti-aliasing. The first image on the far left has no anti-aliasing. You can see that the edges are jagged. Level zero, second from the left, is just burry. Level four, on the far right, is nice and smooth. You might need to zoom in to actually see the detail (I'll make a better demo eventually). I'm sending rays at the corners of each pixel, then averaging the colour values. If the total error of the four points is above a certain threshold, the routinely recursively divides the pixel into four areas and repeats the procedure. This allows areas which need more detail to get it, without slowing down the entire render. For example, with no antialiasing, 10 000 rays were used. The level 4 example here used 24 121 rays, which means that the render takes about 2.5 times longer. However, to get the same level of detail as the level 4 image with plain old supersampling (using a fixed number of rays per pixel) would require a total of 2 560 000 rays, which would have taken 256 times longer than the no anti-aliasing case, or 106 times longer than the adaptive case.


I plan on reorganizing the code again to make it easy to implement different renders so I can generate some examples of the differences between the various anti-aliasing techniques.